
- Categories:
- Maintenance
The Ultimate Outdoor Kitchen Planning Guide: Design Ideas, Layouts, and Must-Have Features
Outdoor kitchens have evolved far beyond a simple grill on the patio. Today’s homeowners are investing in complete outdoor living spaces that combine cooking, dining, entertainment, and relaxation.
For contractors, outdoor kitchens represent one of the fastest-growing opportunities to increase project value while helping homeowners create an extension of their indoor living space. Whether you’re planning a simple grilling station or a fully customized outdoor entertainment area, thoughtful design and proper planning are essential to creating a successful outdoor kitchen.
Why Outdoor Kitchens Are Growing in Popularity
Outdoor living spaces have become one of the most desired home improvements. Benefits include:
- Expanded living space
- Improved entertaining
- Increased property value
- Enhanced backyard functionality
- Better use of patios and outdoor areas
- Greater enjoyment of the landscape throughout the year
For contractors, outdoor kitchens naturally create opportunities to incorporate hardscaping, lighting, drainage, irrigation modifications, fire features, and landscape enhancements into a single project.
Step 1: Choose the Right Location
Location is one of the most important decisions in the planning process.
Access to the Home — most homeowners prefer convenient access to indoor kitchens, utility connections, refrigeration, and storage areas. Shorter walking distances improve functionality and reduce installation costs.
Wind Direction — nobody wants smoke blowing into the seating area. Observe prevailing winds, nearby structures, tree placement, and outdoor gathering spaces.
Views — position the kitchen to take advantage of pool areas, water features, landscape focal points, and sunset views. The outdoor kitchen should become a destination within the landscape.
Step 2: Design Around How the Space Will Be Used
Every outdoor kitchen doesn’t need every feature. Start by asking:
Is this primarily for cooking? Focus on grill upgrades, prep space, and storage.
Is it for entertaining? Focus on seating, bars, refrigeration, and lighting.
Is it a full outdoor living area? Consider fire features, TVs, audio systems, shade structures, and dining areas. Understanding the homeowner’s lifestyle helps guide every design decision.
Step 3: Build an Efficient Layout
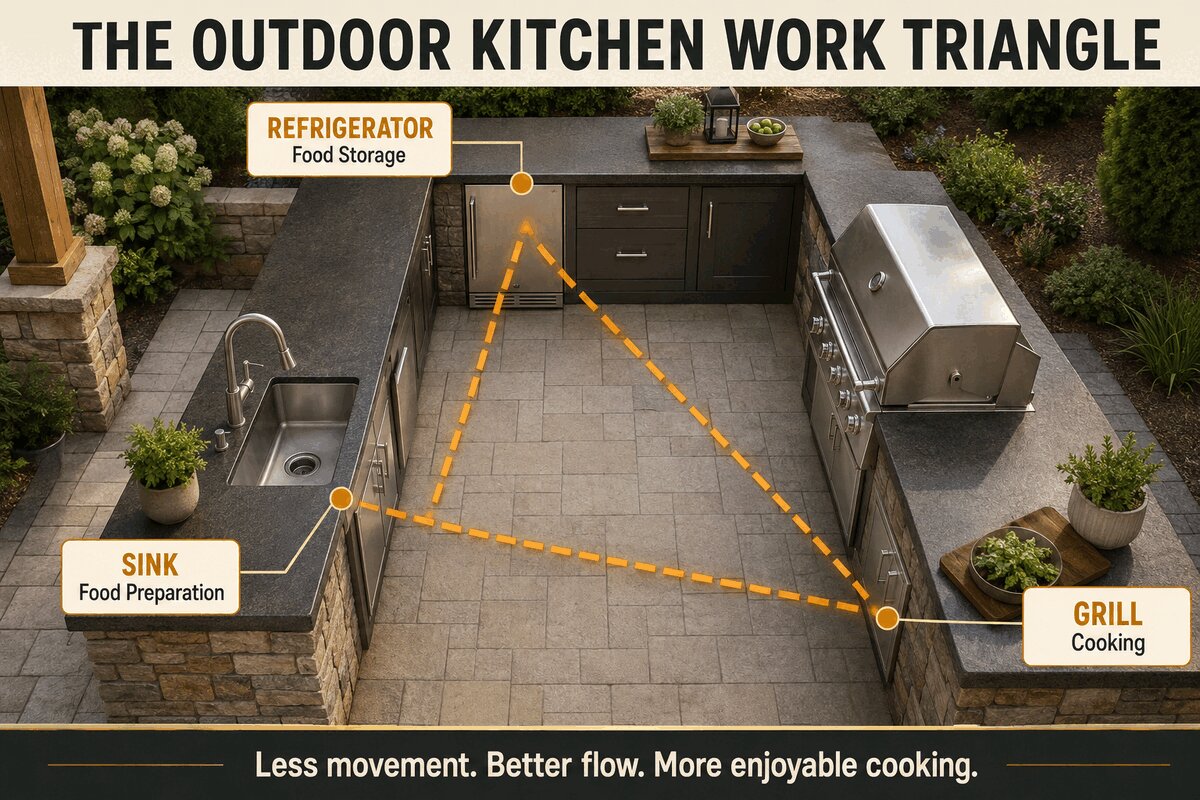
One of the most effective design principles is the outdoor kitchen work triangle. This layout minimizes unnecessary movement between food storage, food preparation, and cooking — making the space more enjoyable and efficient to use.
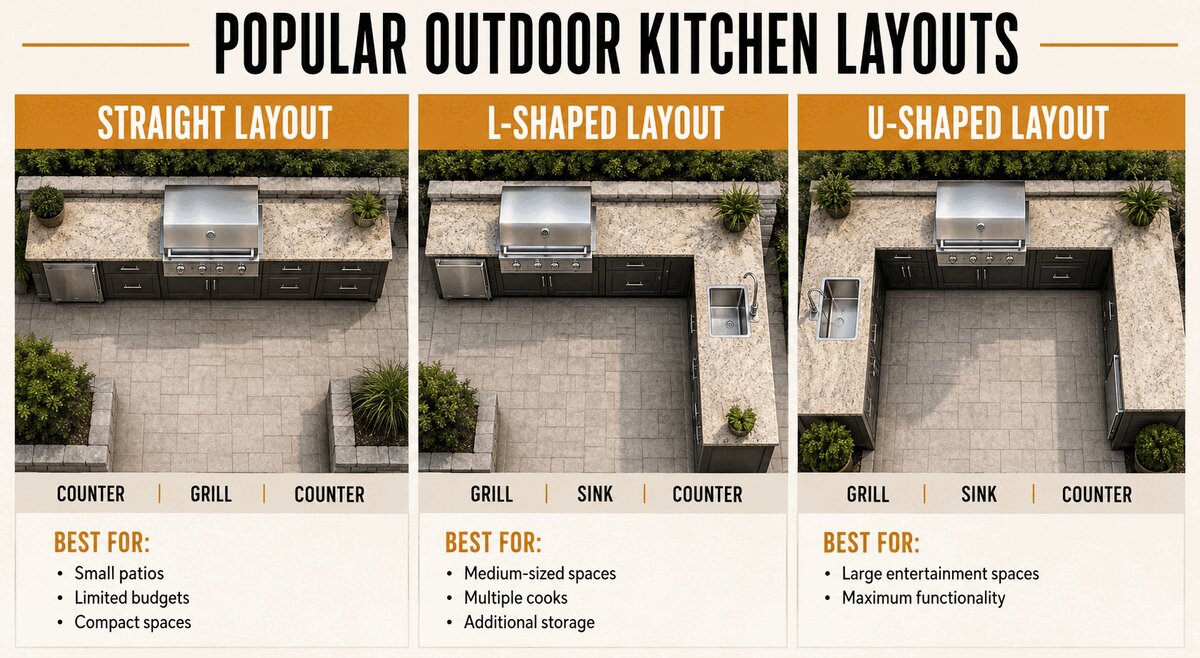
Popular Outdoor Kitchen Layouts
Step 4: Select Durable Materials
Outdoor kitchens face sun exposure, rain, wind, heat, and moisture. Materials must be able to withstand the elements.
Countertops
Popular options include granite, concrete, natural stone, and porcelain slabs. Choose materials that are durable, easy to clean, UV resistant, and weather resistant.
Cabinetry
Stainless steel offers weather resistance, a long lifespan, and a modern appearance. Composite materials offer low maintenance and moisture resistance.
Flooring
Great choices include pavers, natural stone, porcelain pavers, and decorative concrete. Avoid materials that become excessively slippery when wet.
Step 5: Include These Must-Have Features
- Grill — the centerpiece of nearly every outdoor kitchen. Popular options include gas, charcoal, pellet, and hybrid grills.
- Refrigeration — an outdoor refrigerator reduces trips back inside and is perfect for beverages, condiments, and food preparation.
- Sink — a sink significantly increases convenience and cleanup efficiency for hand washing, food prep, and cleanup.
- Storage — include storage for utensils, cookware, cleaning supplies, and grill tools.
Don’t Forget Drainage
Poor drainage can ruin an outdoor kitchen experience. Water should never pool around appliances, flow toward seating areas, or collect near cabinets. Drainage considerations include surface grading, channel drains, catch basins, and hardscape runoff management.
(Related reading: Why Adding Drainage to Hardscape Projects Makes Dollars and Sense)
Outdoor Kitchen Lighting Ideas
Many homeowners underestimate the importance of lighting. A properly illuminated outdoor kitchen becomes usable long after sunset.
- Task Lighting — install lighting above grills, prep counters, and cooking surfaces.
- Ambient Lighting — creates atmosphere around seating areas, dining tables, and entertainment spaces.
- Accent Lighting — highlights stonework, landscape features, and architectural details.
(Related reading: LED Landscape Lighting: How to Choose Quality Lamps That Last)
Add Shade for Comfort
The best outdoor kitchens remain comfortable during hot summer afternoons. Popular shade options include:
- Pergolas — beautiful and permanent.
- Retractable Awnings — flexible and adjustable.
- Pavilions — maximum protection and luxury.
- Shade Sails — budget-friendly modern appearance.
Common Outdoor Kitchen Mistakes to Avoid
- Poor Drainage — standing water leads to maintenance headaches and safety concerns.
- Not Enough Counter Space — homeowners almost always wish they had more prep space.
- Ignoring Storage — storage eliminates clutter and improves usability.
- Poor Lighting — a beautiful kitchen that can’t be used after dark represents a missed opportunity.
- Undersized Utilities — always confirm adequate water service, electrical service, and gas supply.
Outdoor Kitchen Upgrades That Increase Project Value
Contractors can increase project profitability by incorporating:
- Fire Features — fire pits, outdoor fireplaces
- Entertainment Features — TVs, audio systems
- Beverage Centers — kegerators, wine refrigerators, ice makers
- Landscape Enhancements — landscape lighting, decorative plantings, water features
- Outdoor Comfort Features — fans, heaters, misters
Outdoor Kitchen Project Checklist
Before construction begins, confirm the following:
- Layout approved
- Budget established
- Utility requirements identified
- Appliance package selected
- Lighting plan completed
- Drainage plan completed
- Material selections finalized
- Permits secured
- Installation schedule established